Get ready to tantalize your taste buds with the ultimate dessert sensation – the layered red velvet cheesecake! This incredible recipe combines the rich, velvety texture of classic red velvet cake with the smooth, creamy goodness of traditional cheesecake. Your friends and family will be absolutely amazed when you present this stunning dessert at your next gathering.
The red velvet cheesecake recipe is more than just a simple dessert – it’s a culinary masterpiece that brings together two beloved treats in one spectacular creation. Imagine cutting into layers of deep red cake and luxurious cream cheese filling, creating a visual and flavor experience that’s truly unforgettable.
Key Takeaways
- A showstopping dessert that combines red velvet cake and cheesecake
- Perfect for special occasions and gatherings
- Impressive presentation with stunning red and white layers
- Requires some baking skills but worth the effort
- Can be prepared ahead of time for convenience
Introduction to This Decadent Dessert Creation
Get ready for a delicious journey with a decadent dessert that mixes red velvet cake and cheesecake. This amazing treat will make your taste buds dance and take your dessert game to the next level.

Origins of Red Velvet Cake History
The red velvet cake has a rich history, starting in the 19th century in the American South. Its red color came from cocoa and acidic ingredients. In the Great Depression, bakers used beetroot juice to keep the cake moist and vibrant.
- Originated in late 1800s
- Initially created in Southern United States
- Natural coloring from cocoa and beetroot
Why This Recipe Stands Out
This cheesecake recipe turns the classic red velvet cake into something truly special. It combines the tangy cream cheese with the cake’s velvety texture. This mix creates a unique taste that’s both familiar and exciting.
What Makes It Special
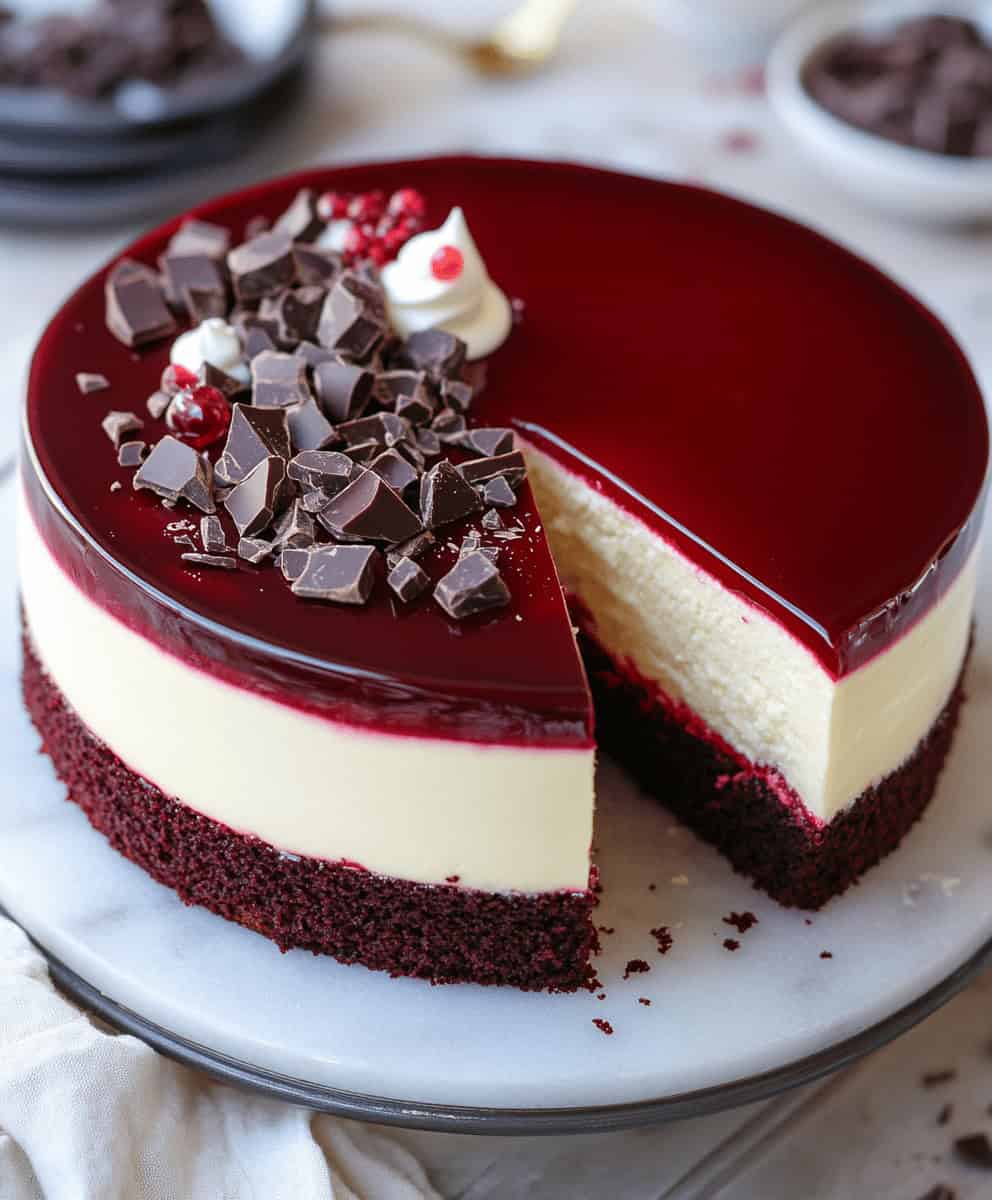
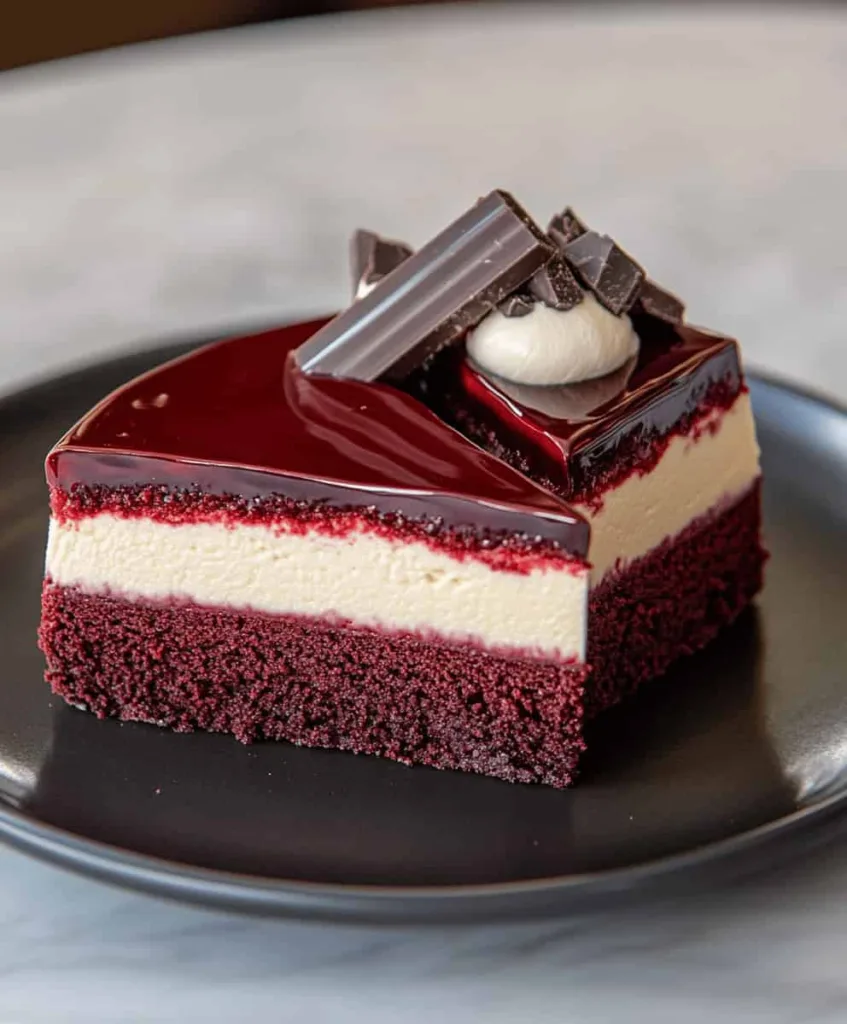
The beauty of this dessert is in its stunning look and mix of textures. Picture cutting into layers of deep crimson cake and creamy white cheesecake. It’s a feast for the eyes as much as the taste buds.
| Feature | Description |
|---|---|
| Color | Vibrant red and creamy white layers |
| Texture | Soft cake meets smooth cheesecake |
| Flavor Profile | Rich, tangy, and subtly sweet |
Essential Ingredients for Perfect Results
Making a stunning red velvet cheesecake needs the right ingredients. These ingredients must work together for amazing flavor and texture. Choosing top-quality items is key to turning simple baking into a special dessert.
Here are the main ingredients you’ll need:
- Full-fat cream cheese (essential for rich, creamy cheesecake layer)
- Buttermilk (provides tender cake texture)
- Cocoa powder (delivers deep chocolate undertones)
- Red food coloring (creates signature vibrant color)
Make sure the cream cheese is soft and at room temperature for easy mixing. Use premium buttermilk for moist and tender cake layers. Choose Dutch-processed cocoa powder for a deeper color and richer chocolate taste.
The quality of your ingredients greatly affects the final result. Professional bakers know that quality matters. Using the best ingredients like pure vanilla extract, fresh eggs, and top-grade cream cheese will make your cheesecake unforgettable.
Each ingredient is important for the perfect mix of flavors and textures. This makes the dessert truly unforgettable.
Required Kitchen Tools and Equipment
To make a stunning layered red velvet cheesecake, you need the right tools. Professional bakers know that the right tools are key. Most of these items are probably in your kitchen already!
Getting ready for this dessert means gathering some key kitchen equipment. The right tools will help you get bakery-quality results at home.
Baking Pans and Sizes
Your pan choice is very important for this recipe. You’ll need:
- One 9-inch springform pan (essential for the cheesecake layer)
- Two 9-inch round cake pans
- Parchment paper for easy cake removal
Mixing Equipment
An electric mixer is your best friend for smooth batters and creamy frostings. You have two main options:
- Stand mixer: Offers consistent mixing and hands-free operation
- Hand mixer: A more budget-friendly and portable choice
Additional Essential Tools
Complete your baking toolkit with these items:
- Offset spatula for smooth frosting application
- Wire cooling rack
- Measuring cups and spoons
- Large mixing bowls
- Rubber spatulas
Investing in quality baking tools will make your cheesecake amazing. Your springform pan and electric mixer are crucial for that professional look and feel.
Preparing the Layered Red Velvet Cheesecake
Starting your red velvet cheesecake journey needs careful planning. It’s all about mastering the layering technique. This makes the dessert truly special.
Your cheesecake adventure begins with the cheesecake layer. This part is crucial for a smooth, creamy texture. Experts say to make the cheesecake layer first and freeze it before putting everything together.
- Start by creating a stable cheesecake base
- Freeze the cheesecake layer for optimal structural integrity
- Prepare red velvet cake batter with precision
Mixing your red velvet cake batter needs precision. The right mix will give your dessert the perfect texture and look. Make sure to measure everything carefully and follow the recipe to get that velvet-like crumb.
The layering process takes patience and practice. Here’s what you should do:
- Chill the cheesecake layer completely
- Prepare your cake layers with care
- Assemble the layers methodically
Pro tip: Freezing the cheesecake layer helps prevent mixing and maintains clean, distinct layers during assembly.
Making the Perfect Cheesecake Layer
Making a perfect cheesecake needs precision and special tips. It’s all about controlling the temperature and technique. Your goal is to make a smooth, creamy cheesecake that will wow everyone.
Professional bakers say temperature and technique are key for the perfect cheesecake. A few strategies can make your baking better.
Temperature Guidelines for Optimal Results
Getting the right temperature is key for a smooth cheesecake. Follow these professional tips:
- Preheat your oven to 325°F
- Make sure ingredients are at room temperature
- Use an oven thermometer for accuracy
Water Bath Technique for Creamy Perfection
The water bath technique is a big help in cheesecake baking. It spreads heat evenly and stops cracking.
- Wrap your springform pan in aluminum foil
- Put the pan in a bigger baking dish
- Fill the outer dish with hot water
- Bake for about 45 minutes
Mastering the Cheesecake Cooling Process
Cooling your cheesecake right is key to avoid cracks and keep it smooth. Follow these steps:
| Cooling Stage | Duration | Temperature |
|---|---|---|
| Oven Cooling | 1 hour | Oven turned off |
| Room Temperature | 2-3 hours | 70-75°F |
| Refrigeration | 4-6 hours | 40°F |
Pro tip: Never rush the cooling process. Slow cooling prevents cracking and makes your cheesecake look professional.
Creating the Red Velvet Cake Layers
Making the perfect red velvet cake layers needs precision and care. Your recipe will stand out with the right technique and ingredient mix. The secret to moist layers is knowing the right cocoa powder ratio and mixing method.
First, gather your key ingredients for that authentic red velvet taste:
- All-purpose flour
- High-quality cocoa powder
- Buttermilk
- Liquid red food coloring
- Unsalted butter
- Granulated sugar
The cocoa powder ratio is key for that classic red velvet taste. Use 2-3 tablespoons of cocoa powder for every cup of flour. This gives red velvet its unique chocolate flavor.
Mixing techniques are crucial for tender crumb. Follow these steps for the best results:
- Sift dry ingredients together
- Cream butter and sugar until light and fluffy
- Add eggs one at a time
- Alternate dry ingredients with buttermilk
- Fold in red food coloring gently
Pro tip: Use room temperature ingredients for smooth blending. This ensures your cake layers are uniform and perfectly textured. Bake at 350°F for 25-30 minutes for bakery-quality layers every time.
| Ingredient | Measurement | Purpose |
|---|---|---|
| All-purpose flour | 2 1/2 cups | Provides structure |
| Cocoa powder | 3 tablespoons | Adds chocolate flavor |
| Buttermilk | 1 cup | Creates moisture |
| Red food coloring | 2 tablespoons | Provides signature color |
Cream Cheese Frosting Preparation
Making the perfect cream cheese frosting is an art. It can take your red velvet cheesecake from good to amazing. The right frosting consistency is key for a great look and taste.
Your frosting starts with a few important ingredients. Make sure they are at room temperature. This helps avoid lumps and makes the frosting smooth.
Achieving the Perfect Frosting Consistency
Getting the frosting just right is all about paying attention. Here are some tips:
- Use full-fat cream cheese at room temperature
- Ensure butter is softened but not melted
- Sift powdered sugar to prevent lumps
- Beat ingredients gradually to incorporate air
Piping Techniques for Professional Results
Learn these piping techniques to make your frosting look amazing:
| Technique | Best Used For | Difficulty Level |
|---|---|---|
| Star Tip Swirl | Cupcake Tops | Beginner |
| Smooth Vertical Lines | Cake Sides | Intermediate |
| Rosette Pattern | Decorative Cake Tops | Advanced |
Practice is key with cream cheese frosting. Try different techniques to find your style.
Assembly and Decoration Techniques
Mastering cake assembly is an art that makes your layered red velvet cheesecake stand out. Your careful approach during this stage will determine the final presentation and taste of the dessert.
Start by preparing your workspace with layer cake tips that ensure precision. Remove the frozen cheesecake layer from the freezer and carefully position it between two red velvet cake layers. The frozen consistency helps prevent crumbling and makes handling much easier.
- Ensure cake layers are completely cooled before assembly
- Use a cake turntable for smooth frosting techniques
- Apply a thin crumb coat first to seal in loose cake particles
- Chill the cake for 15-20 minutes after the crumb coat
When applying frosting techniques, use an offset spatula to create smooth, even layers. Rotate the cake slowly while holding the spatula at a consistent angle. This method helps achieve a professional-looking finish that will impress your guests.
For decoration, consider adding creative touches like:
- Chocolate shavings around the cake’s base
- Piped cream cheese frosting borders
- Sprinkled red velvet cake crumbs on top
- Fresh berries for a pop of color
Remember, patience is key in cake assembly. Take your time, work slowly, and enjoy the process of creating a stunning dessert that will become a centerpiece at any gathering.
Storage and Serving Recommendations
Your Layered Red Velvet Cheesecake needs careful handling to keep its taste and texture. Storing it right is key to keeping every slice as tasty as the first.
For storing your masterpiece, refrigeration is essential. Your cheesecake can stay fresh in the fridge for up to 5 days. To keep it moist and prevent drying, follow these important storage tips:
- Use an airtight container or cake carrier
- Cover the cake loosely with plastic wrap
- Store in the coldest part of your refrigerator
Freezing Layered Cakes with Precision
Freezing layered cakes needs careful steps. For the best results, wrap the cheesecake well to avoid freezer burn. Here’s how to do it:
- Cool the cake completely before freezing
- Wrap tightly in plastic wrap
- Add a layer of aluminum foil for extra protection
- Freeze for up to 1 month
Serving Temperature Perfection
The serving temperature is crucial for your cheesecake. Take the cake out of the fridge 30 minutes before serving. This lets it warm up to the perfect temperature. It enhances the flavors and makes the texture smooth and creamy.
Pro tip: Always use a sharp, clean knife and wipe it between slices for perfect cuts that showcase the beautiful layers of your red velvet cheesecake.
Troubleshooting Common Issues
Baking a perfect layered red velvet cheesecake can be tough. Even skilled bakers face problems that seem tough to solve. But, most issues have easy fixes.
Understanding common baking challenges is key to cheesecake troubleshooting. Your cake might crack, be dry, or have frosting issues. These problems are more common than you think.
- Cracked Cheesecake Surface: Often caused by overmixing or sudden temperature changes. To avoid this, mix ingredients gently and bake in a water bath.
- Dry Cake Layers: Usually caused by overbaking or wrong ingredient amounts. Use exact measurements and check with a toothpick to see if it’s done.
- Frosting Fixes: Runny frosting can be fixed by chilling it or adding powdered sugar to thicken it.
Professional bakers say practice is key. Every try teaches you something new about texture, temperature, and technique.
When you face baking problems, keep these tips in mind:
- Always read the recipe before starting
- Use room temperature ingredients
- Follow mixing and baking instructions carefully
- Allow enough cooling time
Your red velvet cheesecake might not look perfect at first. But, each try will make you better. Enjoy the learning and the tasty results!
Conclusion
You’ve learned how to make an amazing red velvet cheesecake. It’s perfect for special occasions. With patience and precision, you can impress your loved ones.
Making this cake is a challenge that requires skill and dedication. Paying attention to every detail is key. The red velvet and cheesecake mix will make any event unforgettable.
Baking is an art that gets better with practice. Even if your first try isn’t perfect, keep trying. Every baker starts somewhere. Enjoy the journey and the tasty results.
Try new recipes, decorate differently, and have fun. Your red velvet cheesecake success is just a recipe away!
FAQ
How long does it take to make a Layered Red Velvet Cheesecake?
Making this cheesecake takes about 6-8 hours. This includes prep, baking, cooling, and putting it all together. You’ll need to plan ahead because the cheesecake layer needs to freeze and the cake must cool completely before frosting.
Can I make this cheesecake in advance?
Yes, you can! Prepare the cheesecake layer and red velvet cake layers up to 2-3 days early. Once assembled, the cake can stay in the fridge for up to 5 days. It’s great for special events or when you want to prepare ahead.
What makes red velvet cake different from chocolate cake?
Red velvet cake has a tangy taste from buttermilk and vinegar. It uses less cocoa than chocolate cake. This gives it a unique flavor and a bright red color.
Can I substitute ingredients if I don’t have everything on hand?
Some substitutions are okay, but be careful. You can swap Greek yogurt for buttermilk or gel food coloring for liquid. But, changing ingredients can affect the cake’s texture and taste.
How do I prevent my cheesecake from cracking?
To avoid cracks, use a water bath and keep ingredients at room temperature. Don’t overmix and cool the cheesecake slowly. This helps it stay smooth and crack-free.
Is this recipe suitable for beginners?
This recipe is a bit advanced, but a beginner with patience can do it. Just follow the steps carefully and you’ll get great results.
How should I store leftover cheesecake?
Keep the cheesecake in an airtight container in the fridge for up to 5 days. For longer storage, freeze it (without decoration) for up to 1 month. Wrap it tightly in plastic wrap and foil.
Can I make this cheesecake gluten-free?
Yes, use gluten-free flour and cocoa powder instead of regular. Make sure all ingredients are gluten-free for a gluten-free dessert.
What type of cream cheese works best for the frosting?
Use full-fat, block-style cream cheese at room temperature for the best frosting. Avoid low-fat or whipped cream cheese, as they can make the frosting too soft.
How can I tell if the cheesecake is fully baked?
The cheesecake is done when the edges are set but the center still jiggles a bit. It should reach an internal temperature of 150°F (65°C). A slight wobble in the center is normal and will set as it cools.