Transform your weeknight dinner routine with these crispy, golden Chi-Chi’s Baked Chicken Chimichangas that deliver all the flavors of your favorite Mexican restaurant right to your kitchen. This healthier baked version eliminates the need for deep frying while maintaining that irresistible crunch and cheesy, flavorful filling that makes chimichangas so beloved.
Why You’ll Love This Recipe
Chi-Chi’s Baked Chicken Chimichangas offer the perfect combination of convenience and authentic Mexican flavors. These baked beauties are significantly healthier than their deep-fried counterparts, using minimal oil while still achieving that coveted crispy exterior. The recipe is incredibly versatile, allowing you to customize the spice level and add your favorite ingredients. Plus, they’re perfect for meal prep, feeding a crowd, or satisfying those Mexican food cravings without the guilt. The melted cheese, tender seasoned chicken, and perfectly spiced filling wrapped in a golden tortilla creates a satisfying meal that both kids and adults will devour.
Ingredients You’ll Need
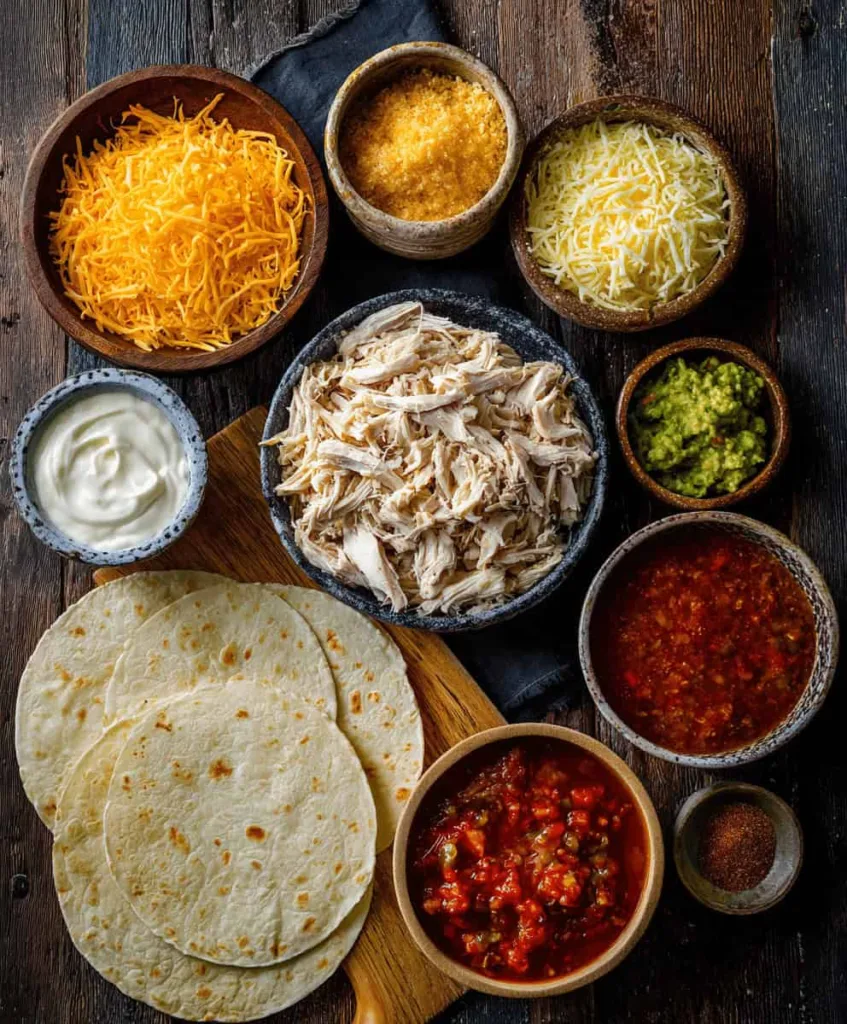
- 2 cups cooked shredded chicken
- 1 cup shredded Monterey Jack cheese
- 1 cup shredded cheddar cheese
- 1/2 cup salsa
- 1/4 cup diced green chilies
- 1 teaspoon ground cumin
- 1 teaspoon chili powder
- 1/2 teaspoon garlic powder
- 1/4 teaspoon cayenne pepper (optional)
- Salt and pepper, to taste
- 6 large flour tortillas
- Cooking spray
- Sour cream, guacamole, and salsa (for serving)
How to Make Chi-Chi’s Baked Chicken Chimichangas
Step-by-Step Instructions
Step 1: Prepare the Oven and Baking Sheet Preheat your oven to 425°F (220°C). Line a large baking sheet with parchment paper and lightly spray with cooking spray to prevent sticking.
Step 2: Make the Filling In a large mixing bowl, combine the shredded chicken, Monterey Jack cheese, cheddar cheese, salsa, diced green chilies, cumin, chili powder, garlic powder, and cayenne pepper (if using). Season with salt and pepper to taste. Mix thoroughly until all ingredients are well incorporated and the chicken is evenly coated with the seasonings.
Step 3: Warm the Tortillas Warm the flour tortillas in the microwave for 20-30 seconds or wrap them in damp paper towels and heat for 45 seconds. This makes them more pliable and easier to roll without tearing.
Step 4: Assemble the Chimichangas Place about 1/3 cup of the chicken mixture in the center of each tortilla, leaving about 2 inches of space on all sides. Fold the bottom edge up over the filling, then fold in the sides, and roll tightly from bottom to top. Place seam-side down on the prepared baking sheet.
Step 5: Prepare for Baking Generously spray the tops and sides of each chimichanga with cooking spray. This ensures they’ll develop a beautiful golden-brown color and crispy texture while baking.
Step 6: Bake to Perfection Bake for 15-20 minutes, or until the chimichangas are golden brown and crispy on all sides. Flip them halfway through cooking time for even browning. The internal temperature should reach 165°F (74°C).
Step 7: Serve Remove from oven and let cool for 2-3 minutes before serving. Serve immediately with sour cream, guacamole, and additional salsa on the side.
Helpful Tips
Choose the Right Tortillas: Use large, high-quality flour tortillas that are fresh and pliable. Stale tortillas are more likely to crack during rolling.
Don’t Overfill: Resist the temptation to overstuff your chimichangas. Too much filling will make them difficult to roll and may cause them to burst open during baking.
Seal Properly: Make sure to roll the chimichangas tightly and place them seam-side down on the baking sheet. This prevents them from unrolling during baking.
Use Cooking Spray Generously: Don’t skimp on the cooking spray – it’s what gives you that crispy, golden exterior that mimics deep-frying.
Customize Your Spice Level: Adjust the cayenne pepper and choose mild or hot salsa based on your heat preference. You can also add jalapeños for extra kick.
Details
Prep Time: 15 minutes
Cook Time: 20 minutes
Total Time: 35 minutes
Servings: 6 chimichangas
Difficulty Level: Easy
Cuisine: Mexican-American
Notes
- For extra flavor, use rotisserie chicken or season your cooked chicken with additional Mexican spices
- You can substitute the cheese blend with Mexican cheese blend or pepper jack for different flavor profiles
- These chimichangas can be assembled ahead of time and refrigerated for up to 4 hours before baking
- For a vegetarian version, substitute the chicken with seasoned black beans or refried beans
- If your tortillas are cracking, they may be too cold – warm them longer or let them come to room temperature
Frequently Asked Questions
Q: Can I make these chimichangas ahead of time? A: Yes! You can assemble Chi-Chi’s Baked Chicken Chimichangas up to 4 hours in advance. Cover them with plastic wrap and refrigerate until ready to bake. You may need to add 2-3 extra minutes to the baking time if baking from cold.
Q: Can I freeze these chimichangas? A: Absolutely! Assemble the chimichangas and freeze them individually on a baking sheet before transferring to freezer bags. They’ll keep for up to 3 months. Bake directly from frozen, adding 5-10 minutes to the cooking time.
Q: What’s the difference between a burrito and a chimichanga? A: While both use similar ingredients, chimichangas are typically smaller, more tightly rolled, and traditionally deep-fried (or in this case, baked) until crispy, whereas burritos are usually served soft.
Q: Can I use corn tortillas instead of flour? A: Flour tortillas work best for chimichangas because they’re more pliable and hold together better during baking. Corn tortillas tend to crack more easily.
Q: How do I know when they’re done? A: Chi-Chi’s Baked Chicken Chimichangas are ready when they’re golden brown and crispy on the outside and the internal temperature reaches 165°F (74°C).
Storage Instructions
Refrigerator Storage: Store leftover chimichangas in an airtight container in the refrigerator for up to 3 days. To reheat, place them in a 350°F oven for 10-12 minutes or until heated through and crispy again.
Freezer Storage: Cooked chimichangas can be frozen for up to 2 months. Wrap individually in aluminum foil or store in freezer-safe containers. Reheat from frozen in a 375°F oven for 20-25 minutes.
Reheating Tips: Avoid microwaving as it will make the tortillas soggy. Always reheat in the oven to maintain the crispy texture that makes these chimichangas special.
Conclusion
Chi-Chi’s Baked Chicken Chimichangas prove that you don’t need to sacrifice flavor for health when it comes to your favorite Mexican foods. This recipe delivers all the satisfaction of restaurant-style chimichangas with the convenience of home cooking and the benefits of baking instead of frying. The combination of perfectly seasoned shredded chicken, melted cheese, and crispy golden tortillas creates a meal that’s both comforting and exciting.
Whether you’re planning a family dinner, meal prepping for the week, or entertaining guests, these baked chimichangas are guaranteed to be a hit. The recipe is flexible enough to accommodate different tastes and dietary preferences, making it a versatile addition to your dinner rotation. With simple ingredients and straightforward instructions, Chi-Chi’s Baked Chicken Chimichangas bring the flavors of your favorite Mexican restaurant right to your own kitchen table.