Wide-Legged Standing Forward Fold is a calming forward bend that stretches the hamstrings and back. There are several arm variations and other modifications available, making this a suitable pose for yoga students of all levels!
Practicing Prasarita Padottanasana on a regular basis can keep your hamstrings and low back flexible, and your mind calm and serene. The more you are able to relax in the pose, the more your body will be able to release tension, stress, and stiffness.
Resisting the pose will only cause your body to tighten up. Breathe deeply and let go. As you relax in the pose you will be able to find ease, softness, and serenity. This pose is also sometimes called “Straddle Fold,” “Standing Straddle,” and “Wide-Legged Forward Bend,” among other variations.

Benefits of Wide-Legged Standing Forward Fold:
Prasarita Padottanasana stretches and strengthens the hamstrings, calves, hips, low back, and spine. The various arm positions stretch your shoulders, wrists, forearms, and upper back. This pose has all of the benefits of both forward folds and inversions, including:
- A calmed mind
- Relief from stress, anxiety, and mild depression
- Relief from mild backaches
- Opened hips
- Relief from neck and shoulder tension
- Toned abdominal organs
- Improved digestion
This pose also quiets and soothes the nervous system. Additionally, it helps prepare the body and mind for deeper yoga poses and introspection.

Tips:
Practicing Prasarita Padottanasana and all of its variations can be a calming way to end your standing sequence. It can also be used to prepare your body for inversions and meditation. Keep the following information in mind when practicing this pose:
- Keep your legs strong and engaged.
- Do not lock your knees.
- Lift and spread your sit bones.
- Keep your face and your gaze soft.
- Emphasize lengthening the front of your torso rather than focusing only on bringing your head and hands all the way down. Bend your knees, or place your hands on blocks, to keep this length as you fold forward.
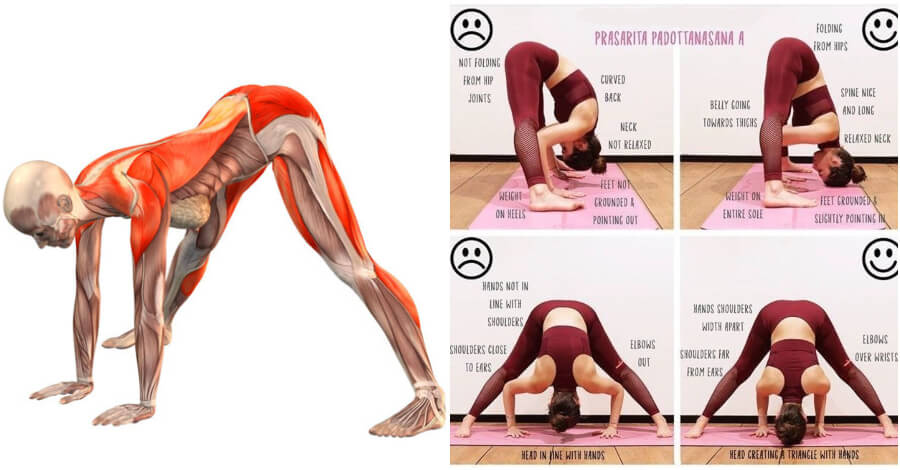
- Fold from the hips, not the waist. To learn this movement, place, and press your hands directly on your front hip bones. Then hinge forward from that spot. Keep your torso long.
- Come up from the pose with a flat back. This will help strengthen the back muscles.
- Aim for aligning your ankles, knees, and hips. It’s common to lean back, placing too much weight on the heels.
Wide-Legged Forward Bend: Step-by-Step Instructions
Step 1:
- Stand in Tadasana (Mountain Pose), facing one of the long edges of your sticky mat, then step or lightly hop your feet apart anywhere from 3 to 4 1/2 feet (depending on your height: taller people should step wider).
- Rest your hands on your hips, make sure your inner feet are parallel to each other.
- Lift your inner arches by drawing upon the inner ankles, and press the outer edges of your feet and ball of the big toe firmly into the floor.
- Engage the thigh muscles by drawing them up.
- Inhale and lift your chest, making the front torso slightly longer than the back.
Step 2:
- Exhale and, maintaining the length of the front torso, lean the torso forward from the hip joints.
- As your torso approaches parallel to the floor, press your fingertips onto the floor directly below your shoulders.
- Extend your elbows fully, your legs and arms then should be perpendicular to the floor and parallel to each other.
- Move your spine evenly into the back torso so that your back is slightly concave from the tailbone to the base of the skull.
- Bring your head up, keeping the back of the neck long, and direct your gaze upward toward the ceiling.

Step 3:
- Push your top thighs straight back to help lengthen the front torso, and draw the inner groins away from each other to widen the base of your pelvis.
- Take a few breaths and as you maintain the concavity of your back and the forward lift of your sternum, walk your fingertips between your feet.
- Take a few more breaths and then, with an exhalation, bend your elbows and lower your torso and head into a full forward bend.
- Make sure as you move down that you keep your front torso as long as possible.
- If possible rest the crown of your head on the floor.
Step 4:
- Press your inner palms actively into the floor, fingers pointing forward.
- If you have the flexibility to move your torso into a full forward bend, walk your hands back until your forearms are perpendicular to the floor and your upper arms parallel.
- Be sure to keep your arms parallel to each other and widen the shoulder blades across the back.
- Draw your shoulders away from your ears.
Step 5:
- Stay in the pose anywhere from 30 seconds to 1 minute.
- To come out, bring your hands back on the floor below your shoulders and lift and lengthen your front torso.
- Then with an inhalation, rest your hands on your hips, pull your tail bone down toward the floor, and swing the torso up.
- Walk or hop your feet back into Tadasana.
Modifications & Variations:

Prasarita Padottanasana is a soothing stretch that releases the whole back-side of your body when practiced correctly. Be sure to take it slowly and never force the pose. Try these changes to find a variation of the pose that works for you:
- If your hands don’t easily reach the floor, place each hand on a yoga block.
- If your head comes easily to the floor, narrow your stance.
- Your hamstrings are very tight? bend your knees.
- For a restorative version of the pose, rest your head on a yoga block or bolster.
- Advanced practitioners may come directly into Tripod Headstand (Sirsasana) from this pose.
- There are several arm variations for this pose. The instructions listed above are for Prasarita Padottanasana A. Other traditional variations include:
- Prasarita Padottanasana B: From your standing pose in step 1, keep both hands on your hips and point your elbows directly behind your body. Then, come into the fold.
- Prasarita Padottanasana C: From standing, reach your arms behind your body and interlace your fingers. Come into the fold and extend your knuckles overhead. More advanced students may bring their knuckles all the way overhead to rest on the floor.
- Prasarita Padottanasana C variation: From standing, reach your arms behind your body and clasp your elbows. Then, come into the fold.
- Prasarita Padottanasana D: Come into Prasarita Padottanasana A. Then, extend your arms to the side and clasp your big toes between your first two fingers and thumbs. With your arms out to the side, bend your elbows over your wrists.