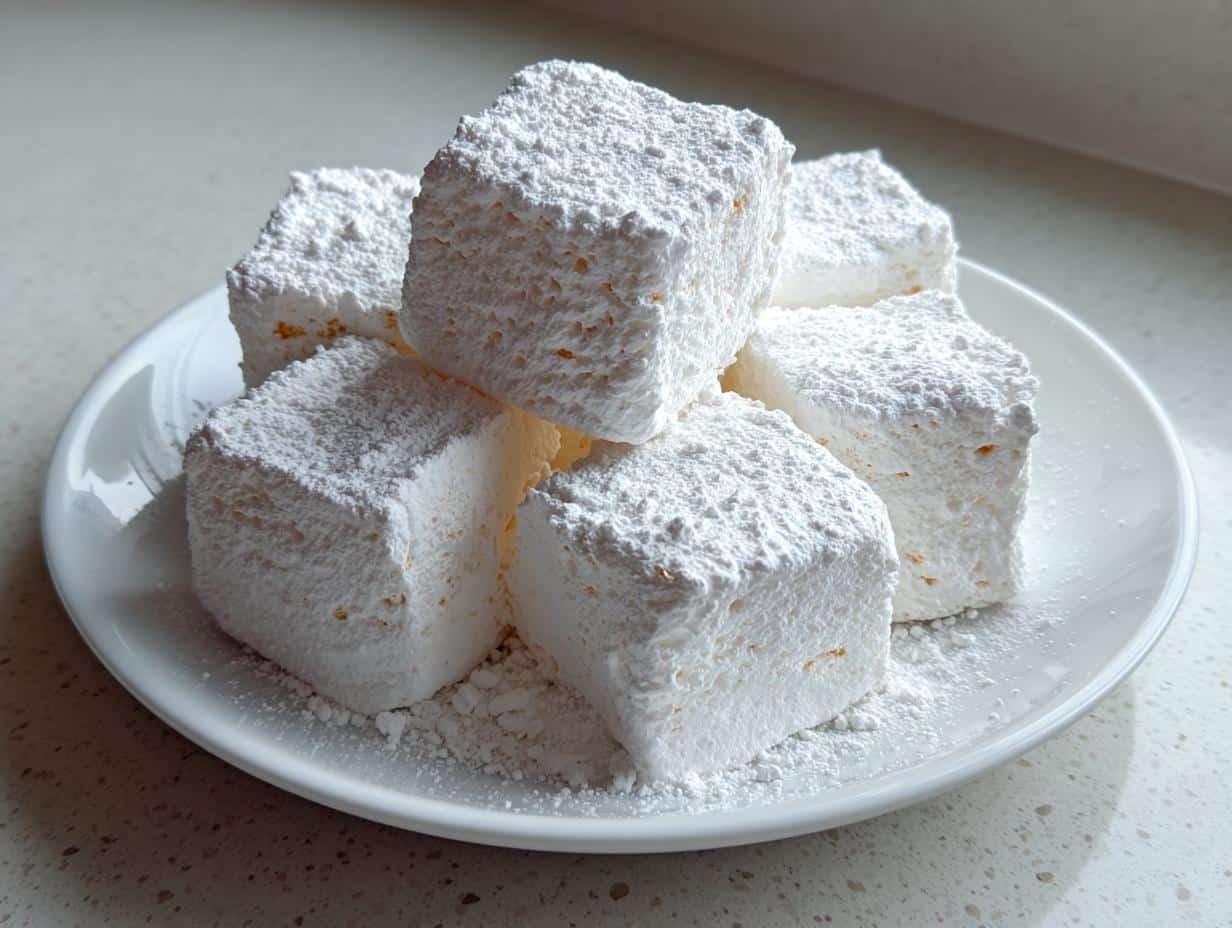
Oh, homemade marshmallows—just the thought of them takes me back to snowy afternoons in my grandma’s kitchen, where she’d whip up big, pillowy batches that melted like clouds in hot cocoa. Store-bought marshmallows? Pfft. They don’t even come close to the fluffy, melt-in-your-mouth magic of the real deal. And guess what? Making them from scratch is way easier than you’d think! This marshmallow recipe is my go-to—just a handful of simple ingredients, a little patience (okay, and maybe a candy thermometer), and bam! You’ve got marshmallows so light, they practically float off the plate. Trust me, once you try these, you’ll never go back to the bagged stuff.
Why You’ll Love This Marshmallow Recipe
Okay, let me tell you why this marshmallow recipe is about to become your new obsession. First off, the texture—oh my gosh, the texture! These marshmallows are so fluffy, they practically dissolve on your tongue like sweet little clouds. And the ingredients? Super simple stuff you probably already have in your pantry (I mean, sugar, egg whites, vanilla—that’s it!). Plus, the customizing possibilities are endless. Toss in some peppermint extract for holiday vibes, or swirl in cocoa powder for a chocolatey twist. And here’s the kicker: they’re way cheaper to make at home than buying those sad, rubbery store-bought ones. Win-win!
Ingredients for Your Marshmallow Recipe
Alright, let’s gather our marshmallow-making arsenal! Here’s what you’ll need to whip up these fluffy wonders:
- 1 cup granulated sugar – The sweet backbone of our marshmallows. Don’t skimp!
- 1/2 cup light corn syrup – Keeps things smooth and prevents crystallization.
- 1/4 cup water (for the syrup) – Just plain ol’ water to dissolve the sugar.
- 1/4 teaspoon salt – A tiny pinch to balance the sweetness.
- 2 teaspoons vanilla extract – Pure vanilla, please! It makes all the difference.
- 2 large egg whites (room temperature) – They’ll whip up into stiff, glossy peaks.
- 1 tablespoon powdered gelatin – The magic that gives marshmallows their bounce.
- 1/4 cup cold water (for gelatin) – To bloom the gelatin properly.
- 1/4 cup powdered sugar + 1/4 cup cornstarch (for dusting) – This combo keeps your marshmallows from sticking like glue.

Ingredient Notes & Substitutions
No corn syrup? Honey or agave syrup can work, but they’ll add their own flavor (and might make the marshmallows a tad denser). For a vegetarian twist, swap gelatin with agar-agar—just note it sets firmer, so adjust the amount. Ran out of vanilla? Almond extract or even peppermint can jazz things up! And if you’re nervous about raw egg whites, pasteurized ones from a carton work too. Just don’t tell Grandma I said that.
Equipment You’ll Need for This Marshmallow Recipe
Before we dive into marshmallow-making madness, let’s talk tools—because trust me, you do not want to realize midway that you’re missing something crucial (been there, sticky-fingered and panicked). Here’s the marshmallow essential kit:
- Stand mixer or handheld electric mixer – Your arms will thank you. This recipe needs serious whipping power!
- Candy thermometer – Non-negotiable. That sugar syrup needs to hit 240°F exactly—no guessing games.
- 8×8-inch baking pan – Grease it well and dust with that powdered sugar-cornstarch mix to prevent marshmallow cling.
- Silicone spatula – For scraping every last bit of fluffy goodness into the pan.
- Saucepan – Medium-sized, preferably with a heavy bottom for even heat.
That’s it! (Well, besides bowls and measuring cups—but you’ve got those, right?)
Step-by-Step Marshmallow Recipe Instructions
Alright, let’s get to the fun part—transforming these simple ingredients into cloud-like marshmallows! Follow these steps carefully, and you’ll be a marshmallow wizard in no time. I’ve made this recipe dozens of times, and trust me, the key is patience and a little bit of arm muscle (or a trusty mixer).
Blooming the Gelatin
First up: bloom that gelatin. This step is crucial—it’s what gives your marshmallows that magical bounce. Sprinkle the powdered gelatin over 1/4 cup cold water in a small bowl and let it sit for 5 minutes. It’ll turn into a weird, jiggly blob, and that’s exactly what you want! This “blooming” hydrates the gelatin so it melts smoothly later. Skip it, and your marshmallows might end up lumpy. (Yes, I learned that the hard way.)
Preparing the Sugar Syrup
While the gelatin does its thing, grab a saucepan and combine the sugar, corn syrup, water, and salt. Clip on that candy thermometer—this part’s non-negotiable. Heat it over medium, stirring just until the sugar dissolves, then stop stirring and let it bubble away until it hits 240°F (the “soft-ball stage”). This temperature is your marshmallow’s backbone—too low, and they’ll be goo; too high, and they’ll turn into sweet little rocks. Watch that thermometer like it’s the season finale of your favorite show.
Whipping the Egg Whites
Now, the egg whites! In a clean bowl (any grease will sabotage you), beat them on high until they form stiff peaks—that means when you lift the beaters, the peaks stand straight up without flopping over. Think “meringue mountain” vibes. Pro tip: Room-temperature egg whites whip up faster and fluffier, so plan ahead!
Combining and Setting
Here’s where the magic happens. With the mixer on low, slowly drizzle the hot syrup into the egg whites—careful, it’s lava-hot! Then add the bloomed gelatin and vanilla. Crank the speed to high and whip for a solid 5-7 minutes until it’s thick, glossy, and tripled in volume. Pour it into your prepared pan, smooth the top, and let it set for 4 hours (or overnight). No peeking—good marshmallows take time! When they’re ready, dust your knife with powdered sugar and slice ’em into squares. Boom: homemade marshmallow heaven.

Tips for Perfect Marshmallows
Listen up, marshmallow-makers—these little tricks are what separate the fluffy triumphs from the sticky disasters. First: grease that pan like you mean it, then dust generously with the sugar-starch mix. I once skimped and spent 20 minutes chiseling marshmallow off the corners—not cute. Humidity? Marshmallow enemy #1! Pick a dry day if you can, or run the AC—too much moisture makes them weep. When cutting, wipe your knife between slices (more dusting helps too). And here’s my secret: let them sit uncovered overnight before storing—it gives the exterior that perfect dry “skin.” Oh, and taste-testing? Mandatory. Quality control is important work!
Marshmallow Recipe Variations
Okay, here’s where we have some fun! Once you’ve mastered the basic marshmallow recipe, the flavor possibilities are endless. My personal favorite? Swirling in 2 tablespoons of cocoa powder at the end for chocolate marshmallows—heaven in hot cocoa. During the holidays, I swap the vanilla for peppermint extract and add crushed candy canes to the dusting mix (festive and delicious!). Feeling fancy? Fold in toasted coconut or crushed freeze-dried strawberries for texture. Pro tip: For colored marshmallows, add a few drops of gel food coloring when you mix in the vanilla—just don’t go overboard or you’ll stain your mixer bowl (another lesson I learned the hard way).
Storing and Serving Your Marshmallows
These homemade marshmallows deserve the royal treatment—both in storing and serving! Keep them fresh by tucking them into an airtight container with layers separated by parchment paper. They’ll stay fluffy for about 2 weeks (if they last that long!). For serving, go beyond hot cocoa—toast them lightly with a kitchen torch for s’mores vibes, layer them in homemade ice cream, or even sandwich them between cookies for next-level treats. My niece loves when I cut them into fun shapes with cookie cutters for birthday parties. The options? Endlessly sweet!
Marshmallow Recipe FAQs
Got marshmallow questions? I’ve got answers! Here are the most common hiccups (and solutions) from my years of marshmallow-making misadventures:
Can I use agar-agar instead of gelatin?
Yes—but it’s trickier! Agar sets firmer, so use 2 teaspoons (not tablespoons!) dissolved in hot water. The texture will be slightly less bouncy but still delicious. Perfect for vegetarians!
Why did my marshmallows turn out sticky?
Humidity is usually the culprit. Always make them on dry days, and don’t skimp on the powdered sugar-cornstarch coating. If they’re sticky after cutting, roll each piece in more dusting mix.
Can I skip the candy thermometer?
Oh honey, no. That 240°F syrup temperature is non-negotiable for proper texture. A $10 thermometer saves you from gummy disasters!
How long do homemade marshmallows last?
About 2 weeks in an airtight container—if they last that long! For gifts, I include a “best by” note so friends know they’re fresh.
Why won’t my egg whites whip up?
Any grease in the bowl or on the beaters will sabotage you. Wipe everything with vinegar first, and use room-temp eggs for maximum fluff!

Nutritional Information
Here’s the scoop on what’s in these fluffy clouds of joy (per marshmallow): about 50 calories, 12g carbs, and 0g fat—basically guilt-free happiness! But remember: Nutritional values are estimates and vary based on ingredients used. (P.S. The joy they bring? Immeasurable.)
Final Thoughts
There you have it—your ticket to homemade marshmallow bliss! Once you taste these pillowy-soft treats, you’ll never look at store-bought versions the same way. Don’t be intimidated—yes, it’s sticky business, but oh-so-worth it. Tag me if you make them (@yourhandle), because I need to see your fluffy creations! Happy whipping!
Print
3-Ingredient Fluffy Homemade Marshmallow Recipe You’ll Love
- Prep Time: 20 minutes
- Cook Time: 10 minutes
- Total Time: 4 hours 30 minutes
- Yield: 24 marshmallows 1x
- Category: Dessert
- Method: Stovetop
- Cuisine: American
- Diet: Vegetarian
Description
A simple homemade marshmallow recipe that’s fluffy and sweet.
Ingredients
- 1 cup granulated sugar
- 1/2 cup light corn syrup
- 1/4 cup water
- 1/4 teaspoon salt
- 2 teaspoons vanilla extract
- 2 large egg whites
- 1 tablespoon powdered gelatin
- 1/4 cup cold water (for gelatin)
- 1/4 cup powdered sugar (for dusting)
- 1/4 cup cornstarch (for dusting)
Instructions
- Mix gelatin with 1/4 cup cold water and let it bloom for 5 minutes.
- In a saucepan, combine sugar, corn syrup, 1/4 cup water, and salt. Heat to 240°F (115°C).
- Whip egg whites until stiff peaks form.
- Slowly pour the hot syrup into the egg whites while mixing on low speed.
- Add the bloomed gelatin and vanilla extract. Whip until thick and fluffy.
- Pour the mixture into a greased pan dusted with powdered sugar and cornstarch.
- Let it set for 4 hours or overnight.
- Cut into squares and coat with more powdered sugar and cornstarch.
Notes
- Use a candy thermometer for accurate syrup temperature.
- Store marshmallows in an airtight container.
- Customize with food coloring or different extracts.
Nutrition
- Serving Size: 1 marshmallow
- Calories: 50
- Sugar: 10g
- Sodium: 20mg
- Fat: 0g
- Saturated Fat: 0g
- Unsaturated Fat: 0g
- Trans Fat: 0g
- Carbohydrates: 12g
- Fiber: 0g
- Protein: 1g
- Cholesterol: 0mg
Keywords: homemade marshmallow, fluffy marshmallow, easy marshmallow recipe

