
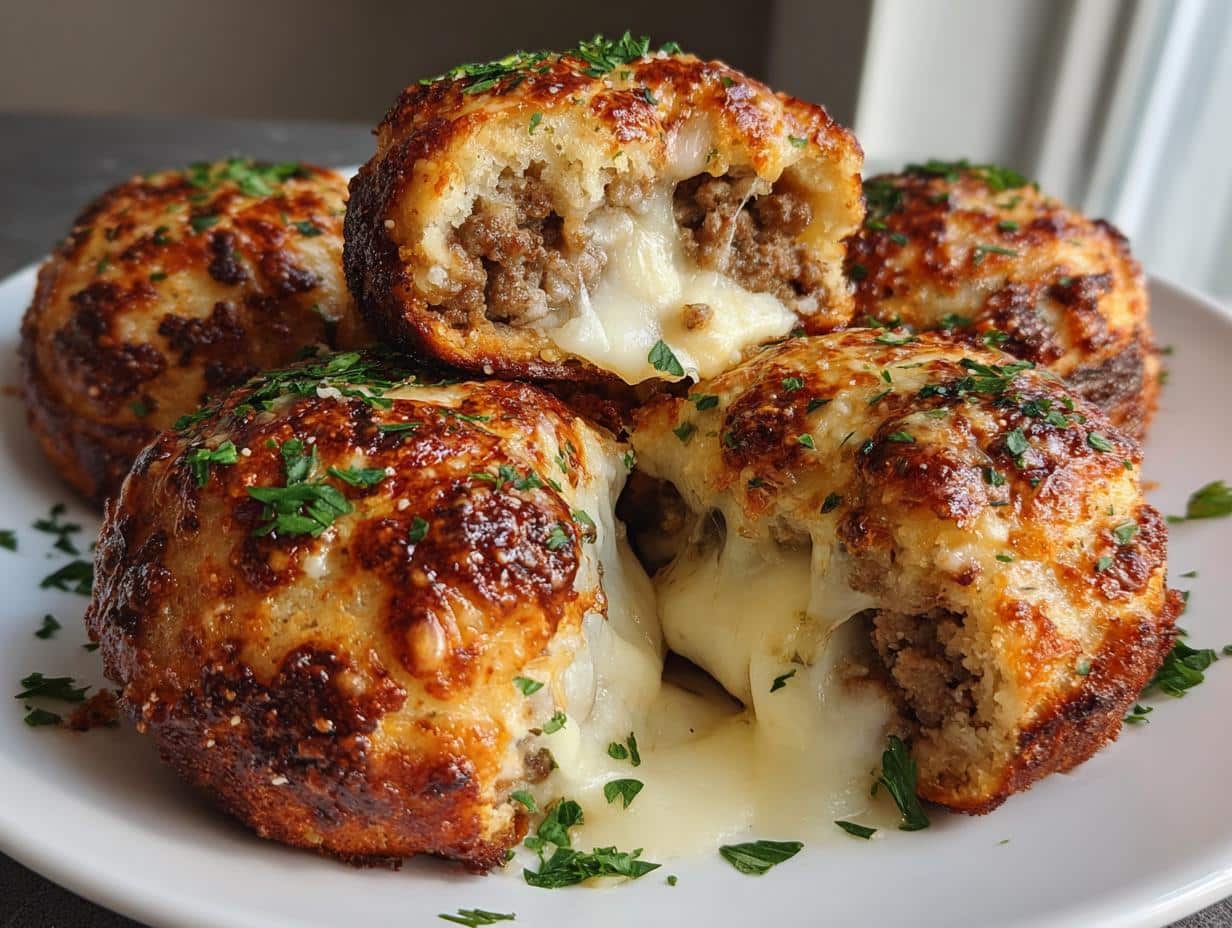
Oh my gosh, you HAVE to try these Garlic Parmesan Cheeseburger Bombs – they disappear faster than I can make them! Picture this: golden-brown biscuit hugs bursting with savory beef and molten mozzarella, all kissed with garlicky Parmesan butter. My kids practically tackle each other for the last one, and every potluck I bring them to? Empty tray guaranteed. The best part? They come together with just a tube of biscuits and basic pantry staples – no fuss, all flavor. Trust me, once you smell that garlic butter hitting the warm cheese, you’ll understand why these little bombs are my secret weapon.
Why You’ll Love These Garlic Parmesan Cheeseburger Bombs
Let me count the ways these little flavor bombs will steal your heart:
- Crazy quick – From fridge to table in under 30 minutes
- Cheese pull magic – That molten mozzarella center gets me every time
- Party perfect – Disappear faster than you can say “appetizer”
- Texture heaven – Crispy outside meets juicy beef and stretchy cheese
- Kid-approved – My picky eaters beg for these weekly
Seriously, they’re the ultimate crowd-pleaser – I’ve never brought leftovers home!
Ingredients for Garlic Parmesan Cheeseburger Bombs
Here’s everything you’ll need to make these irresistible little bombs – I promise it’s all simple stuff you probably already have:
- 1 lb ground beef (80/20 blend works best for juicy flavor)
- 1 tube refrigerated biscuit dough (the 8-count kind – don’t get grands!)
- 1/2 cup shredded Parmesan cheese (the good stuff in the green can works great)
- 4 oz mozzarella cheese, cut into 8 cubes (about 1-inch pieces)
Now for the flavor boosters:
- 1 tsp garlic powder (or 2 cloves fresh minced garlic if you’re feeling fancy)
- 1 tsp onion powder
- 1/2 tsp salt
- 1/2 tsp black pepper
And the finishing touches:
- 2 tbsp melted butter (salted or unsalted – your call)
- 1 tbsp chopped fresh parsley (optional but pretty)
See? Nothing weird or complicated – just pantry staples that transform into something magical!
Equipment You’ll Need
Gather these basics – I bet you’ve got most already:
- Baking sheet
- Large skillet
- Mixing bowl
- Pastry brush (or just use a spoon!)
That’s it – no fancy gadgets required for these cheesy wonders!
How to Make Garlic Parmesan Cheeseburger Bombs
Okay, let’s get to the fun part – making these cheesy, garlicky little bombs of joy! Don’t worry, it’s easier than you think. Just follow these steps and you’ll have golden, melty perfection in no time.
Step 1: Cook the Beef Filling
First things first – crank that oven to 375°F (190°C) so it’s ready when you are. Now, grab your skillet and let’s make the magic happen!
Brown that pound of ground beef over medium heat, breaking it up with your spatula as it cooks. You’ll know it’s ready when there’s no more pink – about 5-7 minutes. Here’s my pro tip: tilt the skillet and use a spoon to drain off that excess fat (trust me, your bombs will thank you later). Now sprinkle in those flavor boosters – garlic powder, onion powder, salt, and pepper – and give it all a good stir. The smell alone will have your stomach growling!
Step 2: Assemble the Bombs
Time to get your hands dirty! Pop open that tube of biscuits (that little “pop” never gets old, does it?) and flatten each one into about a 4-inch circle on your clean counter. No rolling pin? No problem – I just use my hands to gently press and stretch them out.
Now for the fun part – loading them up! Spoon about 2 tablespoons of that delicious beef mixture right in the center, then plop one of those mozzarella cubes on top. Here’s where you gotta pay attention – pinch those edges together like you’re making a little dough purse. Really seal it tight, or you’ll have cheese escapes during baking (been there, done that!). Roll it gently between your palms to form a smooth ball, then place it seam-side down on your baking sheet. Repeat with all eight – you’re almost there!

Step 3: Bake and Finish
Slide those beauties into your preheated oven and let the magic happen for 12-15 minutes. You’ll know they’re done when they turn that perfect golden brown – like little suns of deliciousness!
While they’re still piping hot, brush each one with melted butter (this is where that amazing crispiness comes from) and immediately sprinkle with Parmesan cheese. The heat will make the cheese stick perfectly. If you’re feeling fancy, a little parsley adds that pop of color. Now comes the hard part – waiting a whole 2 minutes before digging in so you don’t burn your tongue on that molten cheese center!
Pro tip: Keep an eye on them around the 12 minute mark – all ovens are different, and you want them golden, not dark brown. When you see that cheese starting to peek out the seams and the bottoms are nicely browned, they’re ready to rock your world!

Tips for Perfect Garlic Parmesan Cheeseburger Bombs
After making these dozens of times (okay, maybe hundreds – my family’s obsessed), I’ve picked up some tricks to make them foolproof every time:
- Keep dough cold – Those biscuits are way easier to handle straight from the fridge. If they get too warm, pop ’em in the freezer for 5 minutes.
- Double the garlic – For serious garlic lovers, swap half the powder for freshly minced garlic in the beef mixture. Your kitchen will smell insane!
- Seal like a pro – Wet your fingertips slightly if the dough won’t stick together – it’s my secret for leak-proof bombs.
- Even is key – Try to make all your biscuit circles about the same thickness so they bake evenly.
- Prevent sticking – A quick spritz of cooking spray on your baking sheet saves so much frustration later.
- Cheese swap – Out of mozzarella? Sharp cheddar gives an awesome flavor punch, or try pepper jack for a kick.
- Make ahead – Assemble them up to 2 hours before baking and just keep chilled until oven time.
The biggest tip? Make a double batch – I learned that lesson the hard way after my kids and their friends demolished the first tray in 30 seconds flat!
Variations and Substitutions
One of the best things about these cheeseburger bombs? You can totally make them your own! Here are some of my favorite twists that always get rave reviews:
- Meat swap – Ground turkey or chicken works great if you’re feeling lighter. Just add an extra pinch of seasoning since they’re leaner.
- Cheese party – Try sharp cheddar for that classic burger vibe, or pepper jack if you like some heat. My neighbor swears by smoked gouda!
- Veggie boost – Toss in some finely diced onions, mushrooms, or even spinach with the beef while cooking. My kids never notice the greens!
- Spice it up – A dash of Worcestershire sauce or hot sauce in the beef mixture gives them serious attitude.
- Dough alternative – Crescent roll dough makes them extra flaky, or try puff pastry for fancy occasions (just reduce bake time a bit).
The beauty is there’s no wrong way – just have fun with it! Last week I added crispy bacon bits to the filling and oh boy, let’s just say they didn’t last long.
Serving Suggestions
Now for the best part – eating these garlic Parmesan cheeseburger bombs! I’ve served them every which way, and here are my absolute favorite pairings:
Dipping sauces are a must – that molten cheese center begs for something creamy. My crew goes wild for:
- Marinara (like mini pizza bombs!)
- Ranch dressing (the cool tang cuts through the richness)
- Spicy mayo (just mix mayo with a squeeze of sriracha)
For parties, I arrange them on a platter with little bowls of different sauces – it’s always a hit. If you’re making a meal of it, pair them with:
- A crisp green salad (the Caesar dressing works magic)
- Roasted veggies (try garlic parmesan broccoli – double the garlic love!)
- Sweet potato fries (that salty-sweet combo can’t be beat)
Got leftovers? (Unlikely, but just in case…) Pop them in a 350°F oven for 5-7 minutes to crisp back up. The microwave will make them soggy – don’t do it! I sometimes stash a few in the fridge for my husband’s late-night snacks – he says they’re even better the next day with an extra sprinkle of Parmesan before reheating.
Storing and Reheating Garlic Parmesan Cheeseburger Bombs
Okay, let’s talk leftovers – though in my house, that’s usually wishful thinking! If you somehow manage to have any cheeseburger bombs left (congrats on your willpower!), here’s how to keep them tasting fresh:
Storing: Let them cool just until they’re safe to handle, then tuck them into an airtight container. They’ll stay happy in the fridge for about 2 days. Pro tip – separate layers with parchment paper so they don’t stick together. Want to freeze them? You totally can! Just wrap each bomb individually in foil, then pop them in a freezer bag for up to a month.
Reheating: Here’s where most people go wrong – microwaving turns these beauties soggy. Instead, revive that crispy magic by reheating in a 350°F oven for 5-7 minutes straight from the fridge (10 minutes if frozen). I like to give them a quick brush with melted butter before warming to bring back that golden crispness. The cheese gets all melty again, and the bottoms crisp up beautifully. Trust me, it’s worth the extra few minutes!
One last tip – if you’re freezing them, I recommend doing it before adding the final Parmesan topping. Just thaw, bake as usual, then add the fresh Parmesan butter finish. That way you still get that restaurant-quality freshness every time!
FAQ About Garlic Parmesan Cheeseburger Bombs
I get questions about these cheeseburger bombs all the time – here are the answers to the ones I hear most often:
Can I freeze these cheeseburger bombs?
Absolutely! I actually keep a batch in the freezer for last-minute guests. Just assemble them (without the final butter/Parmesan topping), then freeze on a baking sheet before transferring to a freezer bag. When you’re ready, bake from frozen – just add 3-5 extra minutes. The cheese still gets perfectly melty inside!
Can I use puff pastry instead of biscuit dough?
You bet! Puff pastry makes them extra fancy – just cut it into squares and reduce the bake time to about 10-12 minutes since it browns faster. The flaky layers are incredible with the cheesy filling. My book club ladies think I slaved for hours when I use puff pastry – our little secret!
How do I prevent cheese from leaking out?
Oh man, I learned this the hard way – you gotta really pinch those edges tight! I use a dab of water on my fingertips to help seal them, then roll gently between my palms to smooth any cracks. And always place them seam-side down – the weight helps keep everything inside where it belongs.
Can I make these ahead of time?
For sure! You can assemble them up to 2 hours before baking and keep them in the fridge. The cold dough actually seals better. Just pull them out while your oven preheats so the biscuits can relax a bit – they’ll bake up nice and even.
What’s the best way to reheat leftovers?
Skip the microwave – it makes them soggy. Pop them in a 350°F oven for 5-7 minutes to bring back that crispiness. Pro tip: brush with a little more melted butter before reheating for that fresh-from-the-oven magic.
Nutritional Information
Okay, let’s talk numbers – but remember, these are just estimates because we all tweak recipes a bit (I know I do!). Here’s the nutritional breakdown per cheeseburger bomb, based on my standard recipe:
- Calories: 280
- Total Fat: 16g (7g saturated)
- Protein: 14g
- Carbohydrates: 22g (1g fiber, 2g sugar)
- Sodium: 450mg
Now, full disclosure – if you go heavy on the Parmesan topping like I sometimes do (no shame!), those numbers might creep up a bit. Same if you use fattier ground beef or extra cheese. But honestly? When that garlicky, cheesy goodness hits your taste buds, you won’t be thinking about numbers – just pure joy!
For my gluten-free friends, swapping in your favorite GF biscuit dough works great too – just check those package nutritionals since they can vary quite a bit. The beef and cheese numbers stay pretty consistent though!

If you’re looking for more delicious recipes, check out all our recipes!
For more appetizer ideas, you might like these appetizers and dips.
You can find more cheesy delights like these Crispy Potato Cheese Bombs.
For more quick and easy recipes, see our quick and easy meals.
If you love these bombs, you might also enjoy our Cheesy Taco Sticks.
For more party-perfect bites, check out our Iowa Party Bites.
See more of my creations on Pinterest.
Print
Garlic Parmesan Cheeseburger Bombs – 5 Ingredients
- Prep Time: 15 minutes
- Cook Time: 15 minutes
- Total Time: 30 minutes
- Yield: 8 bombs 1x
- Category: Appetizer
- Method: Baking
- Cuisine: American
- Diet: Low Lactose
Description
Garlic Parmesan Cheeseburger Bombs are crispy, cheesy, and packed with savory beef and garlic flavors. Perfect as an appetizer or snack.
Ingredients
- 1 lb ground beef
- 1 tube refrigerated biscuit dough (8 count)
- 1/2 cup shredded Parmesan cheese
- 1 tsp garlic powder
- 1 tsp onion powder
- 1/2 tsp salt
- 1/2 tsp black pepper
- 4 oz mozzarella cheese, cut into 8 cubes
- 2 tbsp melted butter
- 1 tbsp chopped parsley (optional)
Instructions
- Preheat your oven to 375°F (190°C).
- In a skillet, cook the ground beef over medium heat until browned. Drain excess fat.
- Add garlic powder, onion powder, salt, and black pepper to the beef. Stir well.
- Flatten each biscuit into a 4-inch circle.
- Place a spoonful of the beef mixture and a mozzarella cube in the center of each biscuit.
- Seal the edges by pinching them together to form a ball.
- Place the bombs seam-side down on a baking sheet.
- Bake for 12-15 minutes until golden brown.
- Brush with melted butter and sprinkle with Parmesan cheese and parsley.
- Serve warm.
Notes
- Use fresh garlic for extra flavor.
- Substitute mozzarella with cheddar if preferred.
- Store leftovers in an airtight container for up to 2 days.
Nutrition
- Serving Size: 1 bomb
- Calories: 280
- Sugar: 2g
- Sodium: 450mg
- Fat: 16g
- Saturated Fat: 7g
- Unsaturated Fat: 6g
- Trans Fat: 0g
- Carbohydrates: 22g
- Fiber: 1g
- Protein: 14g
- Cholesterol: 40mg
Keywords: garlic parmesan cheeseburger bombs, easy appetizer, cheesy snack


Made tonight, wonderful. By the images, I would say you spread butter and parm and popped back in oven, I did and set to broil. Next time I might leave them in just a little longer. They were a bit less browned.
★★★★★