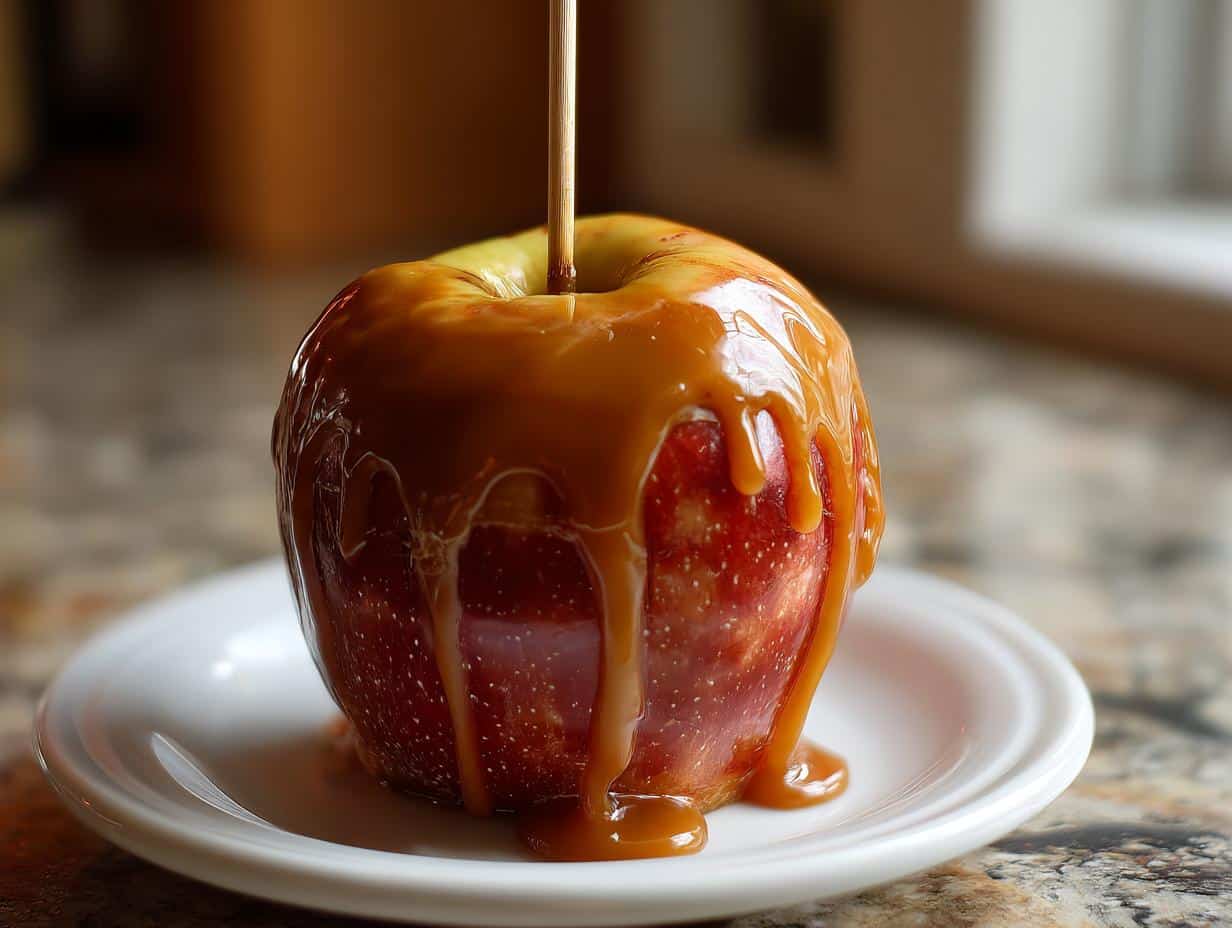
There’s something magical about biting into a homemade caramel apple—that crisp crunch giving way to sweet, buttery caramel. It takes me right back to childhood autumn fairs, sticky fingers and all. These caramel apples aren’t just a treat; they’re a little edible joy you can make in your own kitchen. Trust me, once you try this simple recipe, you’ll never go back to store-bought versions. The secret? A perfect balance of tart apples and rich, velvety caramel that clings just right. Whether it’s for Halloween, a cozy fall night, or just because, these never fail to make me smile.
Why You’ll Love These Caramel Apples
Oh, these caramel apples? They’re a total win—and here’s why:
- So easy: Just 6 ingredients and one saucepan? Even my 8-year-old niece can help (and she does—with *great* enthusiasm).
- That texture: The caramel sets up just right—chewy but never tooth-sticky, with that satisfying *snap* when you bite in.
- Kid magic: Watching apples transform into glittery caramel treasures? Pure kitchen joy. (Bonus: They’ll forget they’re eating fruit.)
- Crowd-pleaser: Bring these to a party and watch them disappear faster than you can say “second helping.”
Seriously, they’re happiness on a stick.
Ingredients for Perfect Caramel Apples
You don’t need much, but every ingredient here *matters*—this is the kind of recipe where quality makes all the difference. Here’s what you’ll grab:
- 6 medium apples: Granny Smith are my go-to—their tartness balances the sweet caramel beautifully. Just make sure they’re cold (helps the caramel cling!).
- 1 cup granulated sugar: No fancy stuff needed, but measure it right—pack it like you mean it.
- 1/4 cup unsalted butter: Real butter only, please. Margarine just won’t give you that rich depth.
- 1/2 cup heavy cream: Half-and-half will leave you with sad, thin caramel. Go for the good stuff.
- 1/4 cup light corn syrup: Keeps the caramel smooth—skip it and risk graininess.
- 1 teaspoon vanilla extract: The secret whisper of flavor that takes it up a notch.
- 6 wooden sticks: The 6-inch ones are perfect—short enough for kids, sturdy enough to hold a generous coat of caramel.
That’s it! Now let’s make some magic.
How to Make Caramel Apples
Alright, let’s get to the fun part! Making caramel apples is simple, but there are a few tricks to get them just right. Follow these steps, and you’ll have perfect caramel-coated apples every time.
Preparing the Apples
First things first—those apples need to be bone dry. Any water left on the skin? The caramel will slide right off, and we can’t have that. I like to wash mine, then give them a good rub-down with a clean kitchen towel. While you’re at it, check for any waxy coating (store-bought apples sometimes have it). A quick scrub with a bit of lemon juice or vinegar helps the caramel stick better.
Now, take those wooden sticks and push them firmly into the stem end of each apple. Give them a little wiggle to make sure they’re secure—you don’t want them wobbling when you dip!
Cooking the Caramel
Here’s where patience pays off. In a medium saucepan, combine the sugar, butter, cream, and corn syrup. Stir constantly over medium heat—no wandering off to check your phone!—until the mixture hits 245°F on a candy thermometer (that’s the “firm ball” stage). If you don’t have a thermometer, look for the caramel to turn a lovely golden amber and thicken enough to coat the back of a spoon.
Once it reaches temp, pull it off the heat and stir in that vanilla extract. Oh, that smell? Pure nostalgia.
Dipping and Setting
Work quickly here—caramel waits for no one! Hold each apple by the stick and dip it into the caramel, turning to coat evenly. Let the excess drip off for a few seconds (I like to twirl it gently), then place it on a parchment-lined baking sheet. If the caramel starts to thicken too much, just warm it slightly over low heat.
Let them cool at room temperature until the caramel sets—about 30 minutes. Resist the urge to poke them! They’ll firm up beautifully, ready to enjoy or wrap up for gifting.
Pro Tips for the Best Caramel Apples
Want caramel apples that look as good as they taste? Here’s my hard-won wisdom from many sticky-fingered trials:
- No shortcuts with apples: Tart, cold Granny Smiths are non-negotiable—their acidity cuts through the sweetness, and that chill helps the caramel cling like a koala.
- Stir like your dessert depends on it (because it does!). Grainy caramel happens when sugar crystals form—constant stirring keeps it silky.
- Work fast after dipping: Caramel sets quickly, so have toppings ready if you’re adding sprinkles or nuts.
- Fridge is your friend: Store them chilled (up to 3 days), but let them sit at room temp for 10 minutes before biting—that caramel gets its perfect chew back.
Trust me—these little tricks make all the difference between “meh” and “more, please!”
Ingredient Substitutions & Variations
Out of corn syrup? No problem! Swap in an equal amount of honey—just know it’ll add a floral note (which I actually love with tart apples). For dairy-free caramel, coconut cream works beautifully in place of heavy cream, and vegan butter does the trick. Want to get fancy? After dipping, roll your apples in crushed peanuts, mini chocolate chips, or even flaky sea salt. Or drizzle melted chocolate over the set caramel for that fairground-worthy finish. The possibilities? Endless.
Storing Your Caramel Apples
Once your caramel apples are set, pop them in the fridge to keep them fresh. They’ll last up to 3 days, but trust me, they won’t stick around that long! Just make sure to store them in an airtight container—moisture is caramel’s enemy. If the caramel softens a bit, don’t sweat it; it’ll still taste amazing.
Nutritional Information
These caramel apples are a treat, so enjoy them in moderation! The nutritional values below are estimates per apple. For full details, check out the nutrition breakdown above—it’s all there!
Frequently Asked Questions
Can I use store-bought caramel instead?
Sure, but homemade is SO much better! Store-bought caramel can be too thick or too sweet—plus, you miss out on that amazing homemade flavor. If you’re in a pinch, look for the soft caramel candies you can melt down, but trust me, 20 minutes with this recipe? Worth it.
Why is my caramel grainy?
Ah, the dreaded graininess! This happens when sugar crystals form. The fix? Stir constantly while cooking, and make sure to fully dissolve the sugar at the start. And never, ever let it boil without stirring—I learned that the hard way!
What are the best apples for caramel apples?
Tart, crisp apples like Granny Smith are perfect—their zing balances the sweet caramel. But Honeycrisp or Fuji work too if you prefer sweeter. Just avoid soft varieties (looking at you, Red Delicious) unless you like mushy bites!
Can kids help make these?
Absolutely! My niece loves inserting the sticks and (carefully!) dipping. Just supervise near the hot caramel—that part’s grown-up territory. The memories? Priceless.
Share Your Caramel Apples!
Did you make these caramel apples? I’d love to see your sticky masterpieces! Tag me on Instagram or leave a comment—tell me how they turned out (or how fast they disappeared!). You can find more delicious recipes on my Pinterest page.
Print
6 Irresistibly Easy Homemade Caramel Apples You Need Now
- Prep Time: 15 minutes
- Cook Time: 20 minutes
- Total Time: 35 minutes
- Yield: 6 caramel apples 1x
- Category: Dessert
- Method: Stovetop
- Cuisine: American
- Diet: Vegetarian
Description
Make your own caramel apples at home with this simple recipe. Perfect for a sweet treat or a fun activity with kids.
Ingredients
- 6 medium apples
- 1 cup granulated sugar
- 1/4 cup unsalted butter
- 1/2 cup heavy cream
- 1/4 cup light corn syrup
- 1 teaspoon vanilla extract
- 6 wooden sticks
Instructions
- Wash and dry the apples. Insert a wooden stick into the top of each apple.
- In a medium saucepan, combine sugar, butter, cream, and corn syrup. Cook over medium heat, stirring constantly, until the mixture reaches 245°F on a candy thermometer.
- Remove from heat and stir in vanilla extract.
- Dip each apple into the caramel, turning to coat evenly. Allow excess caramel to drip off.
- Place the coated apples on a parchment-lined baking sheet and let them cool until the caramel hardens.
Notes
- Use tart apples for a balanced flavor.
- Work quickly when dipping the apples to avoid the caramel setting too soon.
- Store caramel apples in the refrigerator for up to 3 days.
Nutrition
- Serving Size: 1 apple
- Calories: 250
- Sugar: 35g
- Sodium: 50mg
- Fat: 10g
- Saturated Fat: 6g
- Unsaturated Fat: 3g
- Trans Fat: 0g
- Carbohydrates: 40g
- Fiber: 3g
- Protein: 1g
- Cholesterol: 25mg
Keywords: caramel apples, homemade caramel, dessert recipe, sweet treat


