It’s a big move with big benefits, but before you start shifting big weight make sure you’re ready with our comprehensive guide.
The back squat is one of the finest muscle-builders out there, taking centre stage in the training plans of pro bodybuilders, powerlifters, Olympic lifters, footballers and rugby players. There’s really no reason not to include it in your programme – and no reason you shouldn’t reap the same rewards.
The benefits are endless. The squat is one of the primary compound lifts, meaning that you use more than one joint to perform the exercise. It places significant strain on the quads, hamstrings and glutes, making it one of the greatest “bang for your buck” exercises known to man. It also strengthens the joints, ligaments and tendons around the knee and hips.
While it’s a great leg builder, the squat can also boost your performance in other ways. Aside from the target muscle groups, the back squat also requires sufficient ankle stability in order to drive through the heels, core stability to maintain the weight you lift, and also impressive shoulder mobility and trap activation to keep the barbell under control.
Since the move works so much of the body, performing it burns a heck of a lot of calories, aiding your weight loss pursuits. It also boosts your natural production of testosterone and growth hormones.
If you’re a beginner, ensure you’ve got the movement pattern and range of motion nailed by first incorporating unweighted squats into your workouts. Then and only then should you progress to weighted variations.
How To Build Up To The Back Squat
Practise by performing the bodyweight squat. Keep your core tight and place your feet shoulder-width apart, toes pointing outward slightly. Slowly lower your body until your quads are parallel to the floor (or even a little lower), keeping your chest up and back straight.
When you can comfortably perform multiple sets of 15-20 reps you can progress to goblet squats, where you hold a kettlebell or dumbbell with both hands in front of your chest as you perform the move. This adds further resistance and helps you keep your back straight. When you’re happy with your performance here, progress to adding a barbell.
How To Do The Back Squat
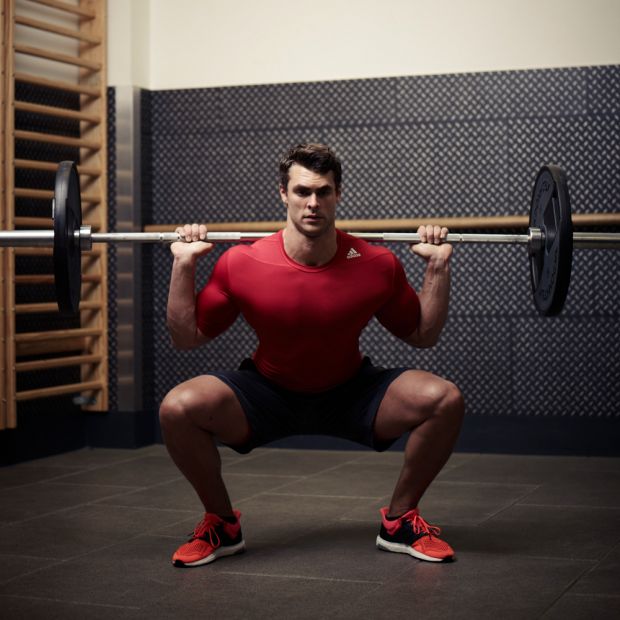
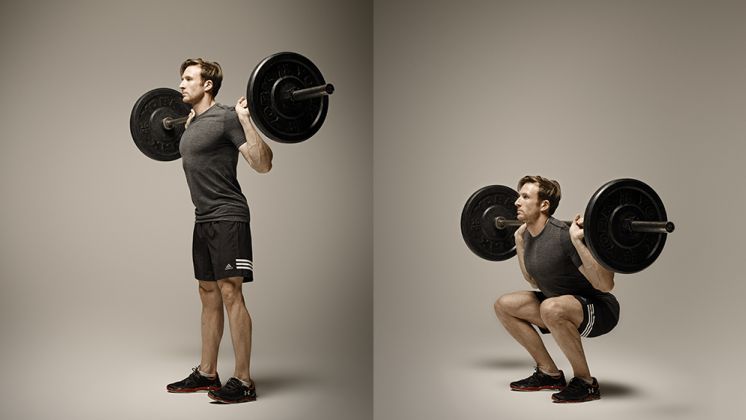
Take the bar out of the rack with it resting on your rear shoulder muscles. Take two big steps back and stand with your feet roughly shoulder-width apart, toes pointing slightly out. Keep your spine in alignment by looking at a spot on the floor about two metres in front of you, then “sit” back and down as if you’re aiming for a chair. Descend until your hip crease is below your knee. Keep your weight on your heels as you drive back up.
Back Squat Form Tips

1. Don’t drop your chin
Before you lower into the squat, pick a point on the wall in front of you and focus on it. Keep looking at that point as you lower and then drive back up. This will help you avoid dropping your chin towards your chest, which encourages unhelpful movement in your upper spine that will cause you to hunch forwards and make it more difficult to complete the lift once you fatigue towards the end of the set. You might also want to avoid staring yourself out in the mirror because that can be distracting.
2. Get your chest up
If you want to lift as much weight as possible and reduce your risk of injury, keep your chest up throughout the move. If you drop your chest, your spine will flex (bend forwards) and that’s not a great thing when you have a heavy load on your back. One thing that will help you keep your chest in the right place is taking a deep breath before you lift and holding the air in your lungs as you lower. Once you begin to rise from the bottom position and are in control of the lift, you can exhale as you return to the start position.
3. Push elbows forwards
Try to push your elbows forwards before you start the lift. This may feel slightly uncomfortable but it will help you maintain a strong position when you move the weight. The reason it helps is because when your elbows point backwards (as opposed to downwards), this encourages your shoulders to internally rotate and makes it harder to keep an upright neutral spine. Pushing your elbows forwards will also help you to engage your lats – your big back muscles – which will further stabilise your upper body.
4. Keep knees in line with toes
Plant your feet roughly shoulder-width apart with your toes turned out slightly at a “ten to two” position. Bend at the knees and hips simultaneously to lower your backside towards the ground and as you lower, keep your knees in line with your toes. It doesn’t matter if your knees go over your toes but you do want to avoid letting them turn inwards. You can spread your knees slightly at the base of the lift to open your hips and sit lower, then squeeze them back in to initiate the upwards movement.
5. Heels flat on the floor
Your weight should be on your heels and mid-foot throughout the lift. If you go onto the balls of your feet you’re in a weaker position that puts extra pressure on your knees. One reason people struggle to keep their heels down is because they have tight hamstrings, so stretch these muscles by squatting down with your back against a wall and hugging your knees to your chest. It doesn’t matter if your spine curves because, in this instance, you’re not carrying external load. The aim here is getting depth.

